 |
|
|
|
|
|
|||||
|
|
|||||
Scale Model Image Gallery - Martin Davis |
|||||
| One35th
|
T.Kaneko
|
Nico Los
|
C.Potter |
R.Lang
|
Ironside
|
| J.Neumeyer
|
Nathaniel Ng
|
Kees v.d.Pols
|
FSM
Jan.2003 |
PMMS |
Dragon
|
| Trumpeter
|
Jon J Bersabal
|
Joeri
Michiels |
B.Lustig
|
P.Albers
|
Summary
|
| Martin
Davis |
Jeff
Brundt |
Juan
|
Projectiles
|
K5
Decals |
Al.Barrel
|
| Model
built by Martin Davis Scale : 1/35 Brand : Dragon Courtesy of Scale Models International 2004 Country of origin : Color used : |
|
|
|
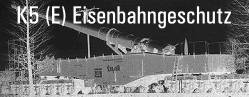
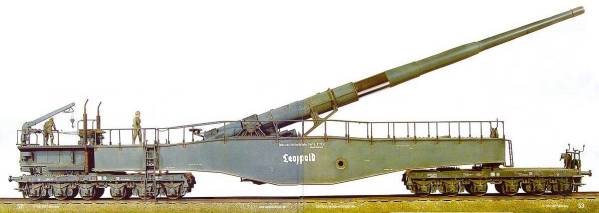
The
Americans were bombarded by two K5(E)'s during the Anzio beach landings,
which led them christening them "Anzio Annie" of the "Anzio
Express". Both were later captured and destroyed, but one of them was
later repaired and tested. The Germans were well known for naming their
armor and artillery, and "Leopold" was the name
given to one of the twenty-five K5(E)'s produced during the war. The type
was commonly known to the Germans as "Schlanke Berta" - Slim
Berta due to its slim profile. |
||
|
|
||
|
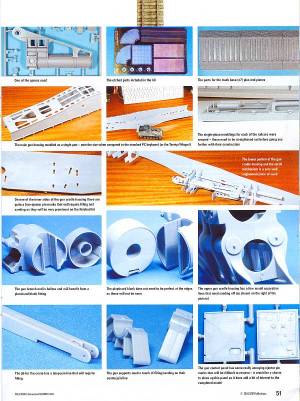
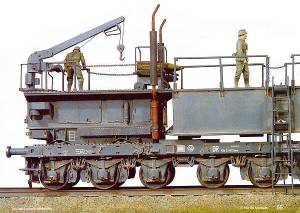
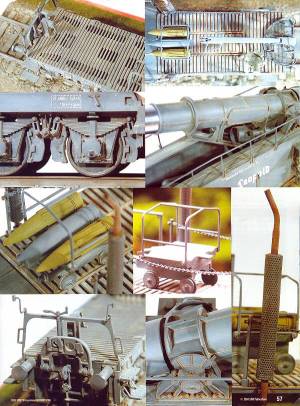
Railcars These are probably the weakest part of the whole kit in term of detail. All areas of the bogies have been over-simplified, with detail either poor or completely missing. A single piece molding for each side of each bogie has all of the suspension and brake details mold into it. When they are in place, trapping the wheel axles between them, the brake pads sit proud of each wheel rim such that they would never actually touch the rims ! I couldn't help thinking at this stage that I was constructing a toy and not an accurate scale model. Added to this there are single piece moldings for the main structure of each railcar, onto which the previously mentioned bogie sides fit., and these were warped lengthways. If left as is , it would have resulted in not all of the wheels not touching the tracks and that would have spoilt the whole model. To get round this, I immersed the part in a tray of very hot water to soften it and then straightened it out whilst it cooled down. After a couple of attempts at this, I finally got them straight and the bogies and other details could be safely added. The wheels have some bad ejector pin release marks on them, but they really don't show up that much on the completed model - they would be hard to resolve anyway, such are their location. Some of the finer details on the railcars can be left off until later in the build so as to prevent any possible damage to them. 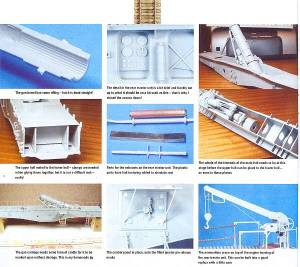 The rear railcar includes a generator to power the hydraulic motors and other such equipment. The roof of this generator house, complete with crane, was used as an ammunition loading bay. The parts included in the kit for the generator housing are again very simplified, with parts such as door handles being molded in and not separate as one would expect these days from similar kits. There are photo-etched parts included for the vertical exhaust covers. These will need to be formed into a cylinder, and the best way to do that is to roll and old paintbrush or similar item over the part on a surface, such as a piece or rubber. Go gently and the cylinder will eventually form. The exhaust themselves will benefit from some texturing, and I coated them in liquid Poly and sprinkled bicarbonate of soda over them; this gives a rusty texture to them, which will show up well once painted.? This generator housing, once in place on the rear railcar, lines up exactly with the gun housing. This is correct for when the gun is in operation as the ammunition carrier can be wheeled from the housing roof to the gun, however when the gun is being transported the generator housing will be too close in this position, and would prevent the gun from traveling around corners, I know from looking at the Trumpeter kit that the end of the housing roof could be dropped down when in transit but I'm not sure whether or not the actual generator itself could be moved backwards on the railcar as well. This would make sense as the mountings for the housings appear to be of a design that would allow them to be moved laterally - on the kit they are fixed however, and all of this means the gun can only be displayed in the firing mode and not in transport. This is probably not an issue as you are only given a straight length of track anyway. |
||
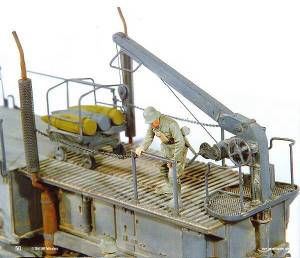 Crane CraneAs mentioned above, the rear railcar generator housing has a crane fitted, used to load ammunition up to the gun. Again, the crane is simplified but can be built into a good replica with a little effort. The main arm of the crane is in two parts and results in a huge join line once together, which will need filling and sanding once dry. Photo-etched flooring is included with the kit and this looks good once installed. I used liquid to soften the plastic below the mesh and pushed the mesh into it, as this secures the brass without the need for superglues, which could block the mesh if not careful. The crane look quite good once complete but be careful of the delicate handrails as they are easily broken. |
||
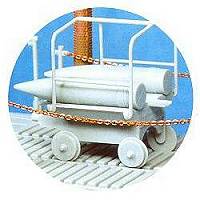 Ammunition Trolley Ammunition TrolleyThe trolley is very basic being made up of only a few parts. The frame that fits onto the trolley looks to be very simple too., especially around the attachment point. I don't have much in the way of reference for this so I just built it as it comes. What is missing from the kit is the clasp that was used to fit each ammunition round - this was a sort of scissor clamp and it would have been quite easy for Dragon to have included it in the kit. |
||
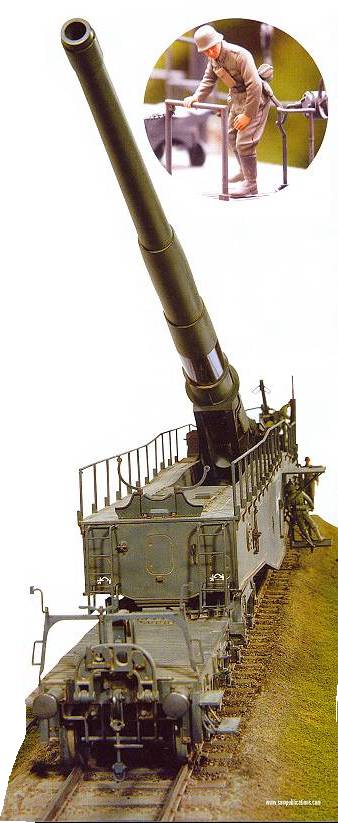
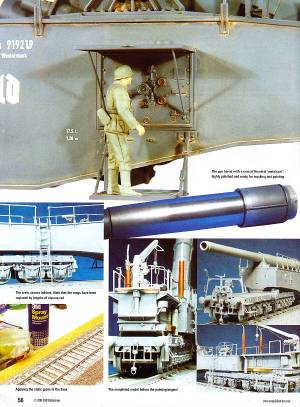 Main Gun and Cradle Main Gun and CradleThis is the real highlight of the kit : the parts are well molded and the detail is quite a bit better than that of the railcars, but what is really outstanding is the engineering of the kit. What I mean by this is the way all the parts fit together, the design of the kit really. The end result is a completed gun with absolutely no warping or distortion and all without the use of filler anywhere. The one piece molding for the outer and lower cradle holds all of the interior structures for the gun, its raising / lowering mechanism, and the associated strengthening plates. There are two massive pieces for the inner walls and three hold all of the strengthening ribs between them as well as the gun. I set about making the lower parts of the gun first and this takes no time at all. There are a few tricky join lines to remove when making the gun but nothing beyond the scope of the average modeler. The inner cradle structure can be built up next, and the only downside of some of these parts are the ejector pin marks on some of the bulkheads. These are not too visible when the gun is in place, but I decided to fill and sand them whilst I had the chance. These are then all glued to one inner side wall and the gun recoil movement system installed. Don't be tempted to leave the gun out at this point to allow it to be painted separately later, as once you glue the inner structures in place, you will not be able to add the gun. I nearly fell into this trap but spotted it just in time. Once all the plates are in place, the outer inner side plate can be added, and at this point I added the gun cradle top plate. There are location groves for all the plates to sit into and this helps when lining everything up. This whole assembly fits into the one piece lower cradle very well indeed, and this is the reason why I deviated from the instructions. By carefully running liquid Poly down the inside of the seam of the top plate and the outer sides, a clean join can be achieved. For added strength, I ran superglue down this joint before gluing the two end plates in place. Before moving any further, I constructed a stand for the gun cradle assembly. I did this to prevent damage to items such as crew access ladders, as these will be well below the bottom of the cradle and will not take the weight. The stand will also aid in the painting stage and is essential when transporting the model to shows etc. The smaller details such as those attached to the sides of the gun can be added now, as all of the heavy work has been completed. The crew access ladders are tricky to assemble as they have separate rungs, I choose not to use the kit rungs as they are difficult to clean up and easy to replace from stock plastic rod, using the kit parts as a guide. The crew hand rails are one piece moldings an, although slightly thick in section, they are more than adequate. They do need some cleaning up of the mold separation line but with care this can be achieved without snapping the parts. The kit also includes some nice fine brass chain to be used for crew safety rails. |
||
 Painting Paintingafter all of this construction work, the Leopold is ready for painting. After all the usual painting preparation, washing, drying etc. the whole model can be primed with my usual Halfords Matt Back aerosol. Whilst the paint dried I took the time to ensure I had enough paint to cover the beast. You have two choice of paint scheme, one in dark yellow with red brown camouflage, and the other overall Panzer Grey. I chose the Panzer Grey scheme and set about mixing a batch of Tamiya XF-63 German Grey with a little XF2 White and XF4 Blue. The exact proportions and not too important as any weathering will change things considerably anyway; I simply mixed quite a light shade of Panzer Grey, enough to cover the whole model. Air brushing started on the rail cars, crane and generator housing. These took quite some time to complete, so it's best to do this over a couple of sittings. Once complete it is the turn of the gun cradle assembly and again, this takes some time to do. Before starting the Panzer Grey, the gun needs to have a natural metal portion added where paint would be removed due to the gun recoiling after firing. Not all wartime photos of the Leopold show this, but I do have some photos where it is clearly seen. I added this using airbrushed Humbrol Metalcote Natural Steel. Once dry it can be buffed to obtained a highly polished surface. This can be masked off for the main painting, but be careful to only use very low tack masking tape as it can be easily damaged. The main painting can be completed now and left to dry overnight. A light shade of the Panzer Grey was mixed and lightly airbrushed over the model in a random fashion. This gave it a bit more interest helping to break up the monotony of the model. A quick spray with Johnson's Klear sealed in the paintwork and provided a sound surface for the markings and weathering. |
||
|
Markings I decided not to use the kit decals as they are slightly incorrect. Instead I used a set of dry transfers from Archer Transfers. I also obtained a set for each railcar. I'm not sure whether or not the railcars would have had markings, but my guess is that since the Germans were particularly fastidious about documenting and marking everything else, they would not have failed to mark up these . As even their standard freight car, wagons had stencils showing weight loading etc. Someone will not doubt correct me here but I think they look better on than off. It was the first time I had used these rub-down transfers and I have to say that I am quite impressed with them, even if they are a little expensive. |
||
 Weathering WeatheringIf you thought the painting stage took a long time to complete then wait till you start doing the weathering. I started off giving the whole kit an oil paint wash. This is nothing more than a very weak solution of black and burnt umber oil paint diluted in white spirit. This is then applied with a small fine brush in the recessed detail, making this heavier around the lower regions and the rail cars. An overall coat of Matt Clear can be done now in preparation for the pastels. The pastels I use are from a cheap set bought in an art shop some years ago. The pastels are used to create a dusty, dirty and faded appearance to the model and they look good if applied correctly. The process is quite easy to do, but again, takes time to do. First a section of model is wetted using a large flat brush and clean water. Then a mix of earth colored pastels are ground up using fine emery paper. These are sprinkled over the wetted area and worked into the surface using a large wet brush. The model is left to dry out and it should left alone until it does. Once completely dry, a stiff bristle brush is used to scrub the area where the pastels have been applied. This leaves the pastels in the recesses and removes most of them from the remaining areas. The effect can be adjusted by removing more or less from the surface, and more can be applied if necessary by simply repeating the process. The end result is very matt and I personally like the effect as it is quite realistic. Indeed, the current trend is to use pigment powders from the likes of MIG Productions. I have not had experience of these but I guess the net effect is the same. The pastels can be used to paint the exhaust stack : this time rusty colors were gorund up and added to a small amount of Tamiya thinner. This was then painted on the exhaust and by mixing different shades of the rust, a very true representation of the exhausts can be created. |
||
|
Figures The kit includes eight superly sculpted crew that have since been released separately by Dragon. These figures come with a choice of arms such that they can be posed differently. Also included are numerous accessories for these figures which is always a welcome addition. You may want to replace the heads with aftermarket resin examples but I don't think these are that bad really, they just need careful painting to bring out the best in them. The addition of the figures is welcome, as there is no additional expense to the main kit and they give the model a sense of scale. |
||
 Ground
work and Tracks Ground
work and TracksThe kit comes with enough track and ground sections to display the Leopold on and, as mentioned earlier, these have been around for some time. There are seven sections of ground plus two end pieces. The sleepers for the track will take some time to clean up simply by the fact that there are so many of them - I would suggest doing a few each time you go about modeling the gun, so as not to completely sicken yourself off. The ground sections need careful alignment so as to minimize the join line between them. I would also suggest that the joins are strengthened with superglue on the underside as there is some weight in these pieces once together. I put mine on a custom made wooden base, and this ensures that nothing come adrift later. The track, complete with sleepers, was aded at this point. No glue was used as the part fit nice and tight and will not come off once the ground work is complete. AT this point, I would also like to thank a friend and fellow modeler for creating some super ground work on the base. The grout was used to build up the sides of the ground around the edge of each side of the base. Whilst this was setting, some fine model railroad grit was worked into the surface of the filler and added to the plastic base with white glue. Using a wet brush, this grit was worked around the sleepers and the tracks until the desired effect was achieved. All this was left to dry for a week, and a stiff brush was used to swep away any grit that had not stuck. Time for me to take over now and I added static grass along the edges of ground work using spraymount. This was added in layers to build up the thickness, and a good coverage is needed to prevent the ground work below showing thru. Once complete, the whole of the ground work was sprayed in a very dark grey/brown mix. This turned out to be as tedious as painting the gun as there is a lot to cover, especially with all the texture of the ground work, good lighting is essential here, as I missed quite a few areas due to shadows from the single strip light I have in my garage. The track sleepers were airbrushed with a more wood color mix of that used on the ground work - don't be too bothered about accuracy when painting the sleepers, as you want the colors to blend in and not to have clear demarcations. The grass was sprayed a mix of Tamiya Park Green lightened with Tamiya Yellow Green. Finally, a very dark grey line was airbrushed down the center of the sleepers to simulate the staining that would occur from the Locomotives. When I placed the gun and railcars on the base it looked wrong, as the base was simply too dark. So it was out with the airbrush and Tamiya Buff to lighten the whole base up. This was sprayed on in an irregular light coat until the desired effect was achieved. |
||
|
Conclusion and Recommendation I really enjoyed building this kit as it's not too complex nor is it too simple. The engineering and design of the kit is first class; that one piece molding is superb, and with a little planning, the kit will produce a fantastic replica you will be proud off. Yes, there are some inaccuracies with this kit and yes, it is very simplified in places but I still think it's worth considering if you want to build a Leopold. The Trumpeter kit may be more accurate but it is very much more involved to build and this alone may justify your decision to buy the Dragon kit. The inclusion of a set of figures makes the kit even more appealing. The main downside to this kit is where to display/store it. It's huge ! With it base it just fits nicely on top of our fireplace but that is not an option, so it will just have to stay in the spare room. I am surprised how few Leopolds I have seen at model shows; plenty of people must have bought one...Go on.. build them, what are you waiting for..? |
||
Acknowledgment
: |
Click |
©
one35th - Last updated on :
Tuesday, May 27, 2008 |
|


 The Kit